Home Featured Privacy Policy Sponsor About LE MINIMALIST
Showing posts with label DIY. Show all posts

NAIL TIPS: HOW TO GET A PERFECTLY STRAIGHT LINE EVERY TIME

Thursday, December 26, 2013

I can't tell you how many manicures I've completely butchered over the years, but no more! I came across this handy little how-to while stumbling through the endless amusement pit otherwise known as the internet. 

I can't remember exactly which site I found it on - but I dedicate this DIY to all the ladies who don't have time to waste re-painting their nail tips this Holiday party season. You're welcome! 


Things you need:
1. Two bottles of nail polish in contrasting colors to create a "french tip" // For a legit Frenchie style, use a cream or baby pink base with a white or cream tip. 

2. A Rubber band!


Paint your bottom coat and make sure you give it enough time to dry before attempting to create the tip. 

Pull the rubber band tight across the nail as seen in photo number one. Hold it in place while you paint the tip. Continue this process until you've painted every tip. Holding the rubber band tight and as straight across the nail as possible is the key for a great line. 

Finish it all up with one - two top coats to keep it strong.

Yeah, it's the easiest thing you've done all Holiday Season, I know.
Image Map

RUSTIC CHIC FOR THE THANKSGIVING TABLE UNDER $50 #MyKindOfHoliday

Friday, November 22, 2013


Target made me feel pretty dang special by including me as a part of their Influencer Network! Guess what this means: One more excuse to shop at Target!  Not like I needed another one, I pretty much live there...  

To get my slacking rear end in go-mode for Thanksgiving this year I've been spending an obscene amount of time sorting through Pinterest for inspiration to create a perfect centerpiece-masterpiece. Decorating has always been my favorite holiday tradition and I'm totally one of those people who put their Christmas tree up in November before Thanksgiving even rolls around. This year I got a little too antsy and it went up right after I took all of my Halloween decorations down. I just can't help myself!

Although my tiny apartment only allows for so many decorations, the centerpiece has been my focal point for years and I tend to decorate the rest of the house based on whatever theme my table ends up with. 

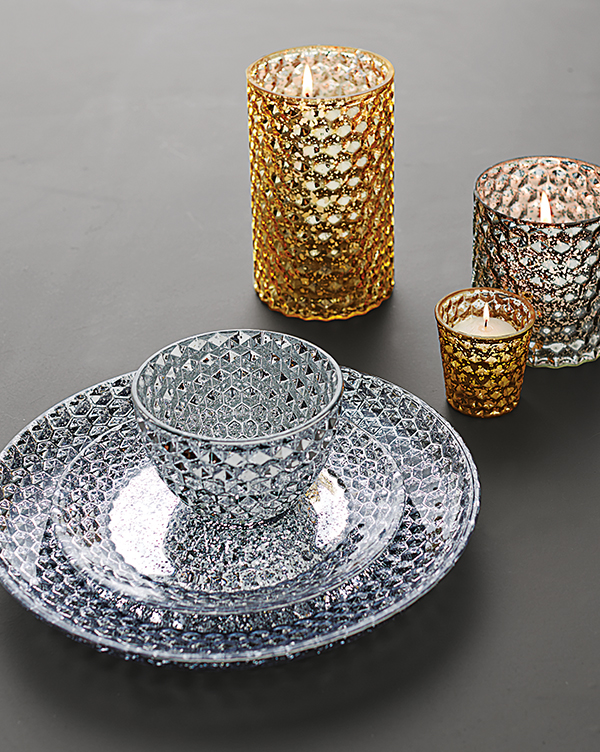
This year I went with a little country / rustic scene filled with earthy tones, moss, pinecones, mercury glass votives and an adorably shabby-chic lantern. All very "Nashville" inspired. I'm totally in love. 

What's even better? I filled my table up with holiday cheer for under $50!

The candle votives ranged in price from $3-$7 and my Threshold Traditional Lantern was under $20. Score!


You can find these beautiful mercury glass votives along with a whole line of mercury glass inspired dinnerware, decor and glassware at Target this season - and honestly, It's a great investment. I've seen so many adorable set ups on Pinterest incorporating mercury glass this year - and not only can you use it for Thanksgiving, but right into Christmas and way on into the New Year. Hard to believe 2013 is almost over, huh?

This is definitely #MyKindOfHoliday - Thanks Target!

PERFECTLY SHAPED COOKIES IN 5 SIMPLE STEPS!

Saturday, July 13, 2013

Remember that one time I made those indescribably good LAVENDER LEMON SUGAR COOKIES

Yeah, those were awesome. 

What made them even more awesome was how I mastered the  art of 'the perfectly rounded cookie' - don't you love life-hacks? 

PERFECTLY SHAPED COOKIES IN 5 SIMPLE STEPS:

You need: 
A toilet paper tube / plastic wrap / tape


1. Roll the dough into a log shape using the plastic wrap
2. Cut a slit through the toilet paper tube and wrap it around the dough-log. 
3. Tape the tube back together to keep the shape
4. Stick the cookie dough tube in the fridge and chill for an hour!
5. UNWRAP / SLICE AND BAKE!

SUMMER HAIR TRENDS: RETURN OF THE CRIMPER

Thursday, June 6, 2013


It's been far too long since we last had a crimper revival. 

Remember that old crimper you had in middle school? Dust that thing off and get crimpy with it.

 I was delighted to re-discover mine after weeks of searching.  Though it was fun rummaging through all of my middle school drivel, (an array of bright notes passed between classes, gel pens, sparkly smiley face stickers, a Furby and a stack of old year books) my most pleasant discovery was my long lost crimper. 


The end result = mermaid hair. Jealous? 
You should be. Need some tips to pull off the perfectly crimped coif? Check out these six easy steps!


Crimping Iron $130 / Forever 21 Hair Brush  $3.80 / Bumble and Bumble - Holding Spray  $21 / Kiehl's Shine Spray $16 / Target Fine Tooth Comb $10 / Fekkai Advanced Thermal UV Protectant $25 + Bobby Pins! 

1. Dirty hair always works best.  The day after a shampoo will provide the most volumous results.  

2. If you need to crimp the day of a shampoo - apply generous amounts of dry shampoo to roots then spray in a good bit of hair spray throughout the entirety of your hair and start crimping. 

3.  Invest in good product! Cheap hair products get cheap results. Ya dig?

4.  Three very important words: HEAT PROTECTANT SPRAY. 

5. If you're the type to only wash your hair every 2-3 days, switch up styles to keep your crimps looking fresh. An up-do with some bobby pins or a tight pony will give you a sleek business look if you've got a 9-5er and have to appease your boss by down playing your crazy tresses. 

6. Be bold! Many crimping irons have various plates you can interchange to make your crimps larger or smaller. Some even have metal plates with heart shapes on them. Mind blown, I know. 


Need some crimpspiration? How about these sassy crimped styles as seen on the runway! I'm in love with that wrapped pony. How great would that be on a hot summer day? 

(Images via Getty)

BANG-UP BETTY 40 CALIBER SHELL DROP EARRINGS: BECAUSE YOU LIKE TO PACK HEAT & LOOK GOOD.

Monday, May 20, 2013

I'm always on the lookout for anything made from recycled goods. 

I feel a little happier inside knowing I'm not contributing to the endless trash pit of rejected material possessions cluttering up our poor Mother Earth. Even more thrilling is when I find a brand who creates beautiful, easily wearable accessories out of unexpected items. 

Case in point: Bang-up Betty - a full on fun fest of bullet shell earrings to add that unexpected bit of badassery to your summer wardrobe. 
Image Map

You can find these hand-made southern charmers on Bang-Up Betty's ETSY or purchase them through Bourbon & Boots a great online resource for southern finery. 

DIY: GOLD LEAF EASTER EGGS

Monday, March 25, 2013


Remember me going on in previous posts about my love affair with gold? Well if you don't, I did! I've also been experimenting a lot with gold leaf - which has been quite the learning process. This stuff is finicky, but the end result is worth the effort. 

SUPPLIES:
+Package of loose gold leaf (Found at any craft store!)
+Glue (I used Martha Stewart Craft's All Purpose Glue because everything she makes is awesome.) 
+A sponge brush with wooden handle (found in paint section)
+Masking Tape
+Toilet Paper Tube
+Scissors


DIY INSTRUCTIONS:
+Tape off sections of the egg you'd like to gold leaf with masking tape. 

+Using the sponge brush, apply glue liberally to area that you'd like to cover.

+Take your fingers and grab a wad of gold leaf, then lightly tap the whole area as carefully as you can with your fingers to press gold leaf to the egg. 

+If you have difficulty with getting the gold leaf to stick, use the handle of the sponge brush to press down on the pieces section by section.

+If you want to do the entire egg, I'd suggest doing one end at a time. Cut down the toilet paper tube to a short length so that the egg rests on top and can dry one side at a time (this will keep the gold leaf from peeling off or getting stuck to whatever you set it on)

+Once your gold leaf pattern has dried - remove masking tape carefully. 


SPRING INSPIRATION: DIY FLORAL SUNGLASSES

Monday, March 18, 2013

I've been in a spring craft frenzy lately. 

Maybe it's all this warm weather going to my head, but I've been obsessed with floral sunglasses and all the incredible DIY variations I've seen floating around on the all-powerful interweb the past few weeks.

  I've been mulling over creating a few for the flea market this coming weekend. A great craft for the official start of the Spring Equinox this Wednesday, the 20th - don't you think? 


As a little spring treat, let's revisit these fun sunnies I created last year for some inspiration: 


LATE NIGHT SNACK: LAVENDER LEMON SUGAR COOKIES

Tuesday, March 5, 2013


I'm a huge lavender advocate - its uses are endless! I'm always using lavender essential oils on cuts, bruises and a pesky pimple or two. Not only does it have its medicinal uses, it really makes for a unique and tasty treat. 

A sweet friend of mine gave me a baggie of fresh lavender -- straight from the farm! I've been dying to give this recipe a go ever since I started seeing different variations crop up on Pinterest

I included a similar recipe on my post THINGS I LOVE ABOUT VALENTINES DAY: FOUR OF MY FAVORITE SWEET AND SIMPLE DIY PROJECTS. This recipe is a little bit different, but I'm absolutely addicted now, and I'm sure you will be too.

This is really a great tea-time cookie, btw. I've been eating them with earl grey and it's delicious! 


Give these delicious LAVENDER LEMON SUGAR COOKIES a try!


INGREDIENTS: 
Makes about four dozen.

3/4 cup sugar
1 and 3/4 cups flour
1/4 teaspoons baking powder
1 and 1/2 sticks of slightly melted butter (I used salted!)
1 egg yolk
1/2 teaspoon vanilla extract
2 tablespoons grated lemon zest
*If you don't have lemons, try oranges!*
2 tablespoons of lemon juice (1-2 lemons)
3 teaspoons dried lavender

START HERE:

Heat oven to 350 degrees

* If you want to use a cookie cutter to create cute shapes - make dough in advance and leave it in the fridge for a few hours until you're ready to roll it out to make shapes. *

Mix sugar, lemon zest and juice and lavender together in a blender on high for about 30 seconds to a minute. 

After you've blended these ingredients leave them to sit while you stir together the flour, baking powder, vanilla, butter and egg. 

Combine lemon/lavender sugar mixture and continue to stir (if you have an electric mixer it's recommended!)

Line your baking sheet with aluminum foil and give it a light spray of oil to keep cookies from getting stuck. 

Space cookies about an inch apart on the sheet, Bake for 10-12 minutes until light golden brown. Enjoy!


TEN MINUTE DIY: FOIL YOUR FRIENDS - GOLD FOIL HAIR HOW TO

Tuesday, February 26, 2013


HOW TO - GOLD FOIL HAIR
It doesn't take much to amuse me. If it sparkles, I'm all up on it. My last Ten Minute DIY: Sparkle Keys is a manifestation of my glitter obsession. Not to mention the fact I own nearly all of Martha Stewart's loose glitter collection. I'd eat the stuff if it was edible. I'm starting to sound crazy...

 Next to my love of glitter, comes gold. Now. Let me just dust off my best Dutch accent for you. -- I LOVE GOOOOLD! Hope you caught the reference. Now, moving on:

+++
Tools/Products:
1. Sponge Brush
2. Hair gel & hair spray
3. Tweezers
4. Small comb
5.  Gold leaf foil - DO NOT USE GOLD LEAF PAINT
6. A friend who is willing and can be paid in beer. 

+++
INSTRUCTIONS:
1. Slick back hair to create flat surface. I used styling gel and a small comb then waited for it to dry a bit so that the hair was sticky - not wet.

2.  Have the mini foil pieces all laid out so they are easy to pick up with tweezers and apply.

3. Pick each piece up with the tweezers, and using either the flat spongy side (make sure it's dry!) or the rounded wooden end of the sponge brush - push foils lightly onto hair until they appear secure then spray each foil chunk with a light misting of hair spray.

4. I know that sounds easy, but getting these little buggers to stick can be difficult if you're not using the right consistency of styling gel - which is all the more reason you'll need to hair spray the living crap out of your hair after they are all in place. 


Katy was such a good sport. I helped her style a shoot this past week and had a great time playing around with my gold foils. You can find Katy's blog here and her art here


Photo via Steve Harman

THINGS I LOVE ABOUT VALENTINES DAY: FOUR OF MY FAVORITE SWEET & SIMPLE DIY PROJECTS

Wednesday, February 6, 2013


I can't get over this. It looks amazing! I'm not a huge fan of popcorn, but when it's popcorn smothered in cheese or chocolate or icing -  my sweet tooth takes over and I just can't say no. You won't be able to resist either!  

This sweet and adorable treat would make the perfect V-Day gift wrapped up in a cellophane baggie with silver and pink ribbon. 


I would love to be on the receiving end of this gift! Lace is always one of my favorite go-tos for girly, flirty events and of course, the holidays - and what better holiday to rock one of these bad ass (but in the most dainty, feminine way) princess crowns than on Valentines Day. 

If you're planning a V-day party these would make excellent party favors. 

And of course this idea is perfect for the kids in your life, not just the adults. I'm already planning to have these at my next soiree. I'll probably make the guys rock them too.  


If you know nothing else about me, then know this: I'm lazy. I'm soooo lazy. God. But even I, in all my laziness can easily find the time to put together these heart warming (or heart attack inducing) little Valentine boxes. If you're not a run of the mill Hallmark card giving type, then this is for you. 

You can spruce this already cute idea up a bit by including little love letters on each heart, or maybe something you love about the person receiving it on each one. Limitless options! 

Hell, I'd even throw some glitter in there. But it depends on how much you love them, because glitter is so hard to clean up, especially if it explodes all over your floor. Yeah.


Iced Lavender Lemon Shortbread Cookies via Montcarte


I'm so into this whole 'Lavender Craze' going on right now. I've always been a huge fan of the essential oils - they are great for everything from burns, cuts, bruises - to wrinkles, pimples and helping to reduce scarring. Now in addition to drowning myself in it, I can eat it! I've been dying to whip up some lavender hot chocolate, so now I have an even bigger excuse to bake up a batch of these delicious, aromatic and let's not forget adorable - heart shaped lavender lemon cookies.

Imagine waking your sweetheart up to a kitchen full of the sweet smell of lavender and lemon on Valentines Day! I ALMOST (but not really) wish I had a boyfriend to bake these for. Almost...


TEN MINUTE DIY: SPARKLE KEYS!

Thursday, December 20, 2012


MATERIALS: 
GLITTER
CLEAR COAT NAIL POLISH
A KEY! OR A LOT OF KEYS!


This is the easiest glitter filled project ever. Ready?

1. Cover top of key with thick layer of clear nail polish. 

2. Sprinkle awesome glitter of your choice

3. Tap off excess and use finger to lightly press down on glitter so it sticks to clear polish.

4. Let dry! Once dry, apply another layer of clear polish to seal the deal. One or two good layers of clear polish would help to make sure it's on there good. I've had mine for a few months now and they haven't pealed off!

5. Ta-da. Your keys are pimp.

And for good measure: I purchased this glitter at the dollar store. But if you're looking for a specific color, I'd suggest Martha Stewart's brand of craft glitters. (A good excuse to use that 40% Michael's coupon you've got laying around)  they're great quality and come in every color! 

SIX QUICK HALLOWEEN COSTUMES FOR GIRLS ON THE GO

Friday, October 12, 2012


FRIDA KAHLO
How easy would this be? Skip your monthly wax and grow out that uni, or create your own using an eyebrow pencil. Bust out that summery flower headpiece one last time, and then accessorize with big, bold baubles and bright blush! 


CARRIE BRADSHAW 
Oh, the many stages of Carrie. You can be pre-Mr. Big Carrie, Wild and free Carrie, or Married Carrie! How about Aidan Carrie. That Carrie was my favorite Carrie. This whole Paragraph now contains eight 'Carries'. Those circa 1990's Minolos that you've been waiting for an excuse to actually wear - well this is it. Don't forget that signature gold "Carrie" name tag necklace. NINE! 


SUGAR SKULL
If your Hallo-week has you floating around to twenty different parties, "makeup costumes" are the perfect way to go. It doesn't require much to put together or a lot of $$ - it only requires you to have patience & a steady hand.  You can get a few ideas for designs from Google Images or check out Pinterest


BJORK // SWAN DRESS 
So. Much. Fun. I found an easy / cute / creative DIY over at Syl and Sam of this exact dress. If you've got some time to spare before Halloween and a sewing machine, give this costume a whirl. 


ZOMBIE / SKELETON GIRL
You can get a pretty good idea of what you need / how to create this look with these two easy to follow instructional videos via Youtube: HERE & HERE. I'll be in NYC for Halloween and need to save room in my suitcase for what really matters. Clothes. 
This is also another cheapie costume - which leaves me $$ to spend on MORE clothes. 


MEDUSA 
Sultry and sensational. I love the unlimited possibilities in this costume. Be as creative or minimal with the idea as you want! If you're feeling lazy, you can always just glue some snakes to a headband, right? Or how about this amazing snake skin textured lip tutorial?

DIY: WAXED DENIM

Wednesday, September 19, 2012


What looks like leather but fits like a jean?
 
Waxed denim! The latest denim craze since that huge burst of floral we saw last year. I had seen several clever tutorials over the past year but still haven't worked up the nerve (or found the perfect test-pair of jeans) to try it out but with this sudden burst of wet waxed denim looks suddenly hitting the fashion scene I can't procrastinate any longer.
 
Expect a tutorial from me soon, but until then you can find a great tutorial below from TheCoveted or if you're feeling lazy - you can find a few amazing pairs of Waxed jeans from J Brand & H&M.

DIY: WAXED DENIM

J Brand cropped pants, $180 / J Brand j brand / H&M low rise jeans, $49 / H&M low rise jeans, $32


DIY TUTORIAL: HOW TO WAX YOUR JEANS VIA THECOVETED


And just for good measure - another step by step DIY can be found HERE by Get Plenty.